
CIVET Coding Form Templates
A CIVET template file specifies the individual components of the form: these are the familiar components from web forms but the syntax used to specify them is simpler than what you will find in HTML.
CIVET is simply adding these controls to an HTML <form> and, as with
all things HTML, most of the placement of the fields is handled by the
browser. [1] CIVET provides some limited formatting through the
insertion of text and line breaks, and with some experimenting you
should be able to keep the form from being too ugly.
The template file should be a simple text file—most systems are happier
if this ends in the suffix .txt—similar to that used in an R
or Stata script (that is, not a formatted file such as that
produced by MS-Word). Appendix 1 gives an example of a template
file, and the code for this can also be downloaded from a link in the
program.
Simple Template-Based Data Entry Form
The basic data entry form just uses the presumably familiar standard HTML data entry fields and should be self-explanatory.
To save a set of coded fields, click one of the buttons which follow the
title Options after saving:
- Code another case:
- Save, then return to the same form
- Download data:
- Save, then download data as a tab-delimited text file
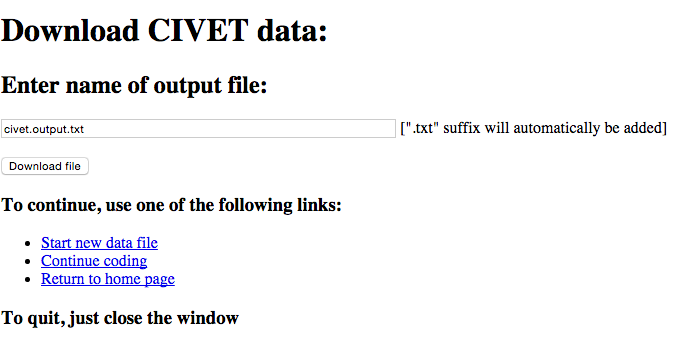
The Download CIVET data page provides a
text box for a file name, and the Download file button downloads the
coded data. Use the Start new data file link to re-start the coding
and the Continue coding with this file link to continue adding to the
existing records.
- The .txt file is tab-delimited and contains the variable names in the first line.
- If the file name does not end in “.txt,” this suffix will be added.
Command formats
Commands generally have the following format
command: entry-title [var-name] options
comma-delimited list
Commands vary in how many of these components they have, but all follow this general pattern.
Each command ends with a blank line (or, if you prefer, the commands are separated by blank lines.)
Commands can also be cancelled by adding a “-” in front of the command: this will cancel the entire command, that is, all of the lines associated with the command, not just the first line. [2] For visual symmetry, a “+” in front of the command “activates” it, though the command will also be active without the plus.
“#” denotes a comment: anything following a “#” is ignored, so lines beginning with “#” are completely ignored.
Items in template specification
The commands involve one or more of the following items:
- entry-title
- This is the title of data entry field. If this ends with
/a line-break (<br>) is inserted after the text. The titles are escaped: at present the characters <, >and the single and double quotes are replaced with the equivalent HTML entities<, > "and’. [3] The entry-title field cannot contain the characters “[” or “]”—if these are present they will be interpreted as bounding the var-name field—but the escaped versions “\[” and “\]” are allowed. - var-name
- The text of the variable name for this field; this will be used in
the first line of the
.csvoutput file - comma-delimited-option-list
- A list of the items that can be selected, separated by commas. A ‘*’ at the beginning of the item means that it will be initially selected.
- comma-delimited-var-name-list
- A list of items which appear in var-name fields, separated by commas.
- page-text
- Any text
- number
- An integer
Errors in template commands
There is a fair amount of error trapping as the commands are processed; any problems will reported on a web page. Generally the system will stop after it has encountered the first error rather than reporting all of the errors in the file.
Specifying variables
Specifying variables to save
This command gives the variables that will be saved; these can be in any
order but each of these must correspond to a var-name somewhere in
the form, or are one of the special variables discussed below. A
tab-delimited version of this list will be the first line of the output
file. The command can occur anywhere in the file.
save:comma-delimited-var-name-list
If the variable name has brackets following it, the value of the
variable rather than the literal text will be written when the data are
written to a tab-delimited file: the value is the string in brackets
[…] in the annotated coding mode. If there is a variable name inside
the brackets, that will be used as the column name for the values;
otherwise the regular name will be used: this allows both the literal
text and the value to be saved, as in the third example below.
If save specifies a value output and not is found, the output depends
on the preference civet_settings.USE_TEXT_FOR_MISSING, which also can
be set on the “Preferences” page. If this is True, the text will be
used; otherwise the string in civet_settings.MISSING_VALUE will be used.
Example:
save:
worldregion, eyewit, groupname, comments

save:
worldregion [regioncode], eyewit, groupname[], comments

save:
worldregion, eyewit, groupname, groupname [groupcode], comments
constant
Sets the value of a variable to a constant; this can be used in a
save:
constant: page-text [varname]
Example:
constant: Data set 0.2 [data_id]
filename
Sets the default file name for the downloads: this can be changed before downloading.
filename: page-text
Example:
filename: our_wonderful_data.csv
Commands only relevant in workspaces
discard
Sets an initially unchecked checkbox for the special variable “_discard_”, which can be used to indicate that a collection has been evaluated by a coder but nothing was coded. When this is checked, a case is generated for the collection containing only the “_discard_” variable; those cases are not used to generate data.
discard: entry-title
Example:
discard: Texts are not codeable
comments
Creates a textarea box for the special variable _comments_ which will be
added to the “casecmt” meta-data for the case being coded. _comments_
can also be added to the output data like any other variable, but this
is not required. The default size of the text box is 4 x 64 characters;
alternative sizes can be specified by adding an empty set of brackets
followed by rows and cols using the same format as the textarea
command. [5]
comments: entry-titlecomments: entry-title [] rows = number cols = number
Example:
comments: Enter any additional comments about this case
header
Sets the HTML code for the display of collection information at the
top of the editing and coding screens. The text of field-name will
be substituted for the optional token _text_ in HTML-text
header: HTML-text [field-name]
field name should be one of the following
workspace- Workspace file name
collection- Collection ID (
collidfield) comments- Collection comments (
collcmtfield)
The three fields are displayed in this order; they default to null strings.
The individual header commands must be separated by blank lines; otherwise,
consistent with the command syntax, [6] the latter lines will be ignored.
Example:
header: <h3><span style="color:blue">Workspace _text_ </span></h3>' [workspace]

header: <b>Collection:</b> _text_ ' [collection]
Special save variables for workspaces
These variables will not include any texts that were deleted using
shift-click on the lede. [7]
- _collection_
collidfield of the collection- _publisher_
- Comma-delimited list of the
textpublisherfields of the texts in the collection - _bibliorefs_
- Comma-delimited list of the
textbibliofields of the texts in the collection
Data entry fields
Any of these commands can be prefixed with “//”, which inserts a <p></p>
or a “/”, which inserts a <br>.
checkbox: Binary checkbox
A simple binary check-box. The value of the variable will be first item in the list when the box is not checked; the second item when the box is checked. The * notation on the second item can be used to specify whether or not the box is initially checked.
select: entry-title [var-name]comma-delimited-option-list
Example:
checkbox: Eyewitness report? [eyewit]
no,*yes
radio: Radio buttons
A series of radio buttons are specified with the syntax
radio: entry-title [var-name]comma-delimited-option-list
The entry / in the option list causes a line-break (<br>) to be
inserted
Example:
radio: Region [worldregion]
North America, South America, Europe, *Africa, /,Middle East, Asia
textline: Enter single line of text
This creates a box for a single line of text (HTML `` type=text``). The
width = number is optional and specifies the size of the text entry
box in characters: the default is width = 32
textline: entry-title [var-name] width = numberinitial-text
Example:
textline: Name of group [groupname]
<enter name>
textclass: Extract single line from annotated text
This creates a box for a single line of text (HTML `` type=text``) that
will interact with annotated text; in addition information can be
manually entered or cut-and-pasted into this box. If this command is
used in a form that does not have associated annotated text, it behaves
the same as textline and the class information is ignored.
The class=class-name is required and specifies the name of the
annotation class that the text-entry box is connected with; a class can
be associated with multiple text-entry boxes. There are four standard
classes:
nament: named-enties, which are determined by capitalizationgeogent: geographical locations, which are determined by acombination of prepositions and capitalization [8]
num: numbersdate: dates
The width = number is optional and specifies the size of the text
entry box in characters: the default is width = 32
textclass: entry-title [var-name] class=class-name width=numberinitial-text
Example:
textclass: Name of city [cityname] class=nament
 <enter city>
textarea: Enter multiple lines of text
This corresponds to an HTML “TEXTAREA” object. The
rows = number cols = number is optional and specifies the size of
the text entry box in characters: the default is rows = 4 cols = 80
textarea: entry-title [var-name] rows = number cols = numberinitial-text
Example:
textarea: Description [descript] rows = 2 cols = 64
Briefly describe the incident
Linking fields
link: Linking select and textline fields
The link: command can be used to connect a select: or dynselect: menu to a set of textline: fields so that their content is filled in from the menu if something is selected, but otherwise these fields can be filled in manually.
link: one-to-four-textline-vars [select-var-name]
The list of variables is space-delimited and all of the variables must have been defined before the link: command is encountered, but otherwise the command can be anywhere in the file.
The rules for extracting the fields depends on the number of variables specified:
- Insert the entire menu item, which can have any format, in the text field
- The entire menu item has the form
xxxxx [yyy]Thexxxxx—which can contain anything except[ ]—is inserted in the first field;yyyis inserted in the second field. This is typically used for names and codes, e.g.Algeria [DZA] - The entire menu item has the form
xxxxx (zzzz) [yyy]Thexxxxx—which can contain anything except( )—is inserted in the first field;zzzzis inserted in the third field, andyyyis inserted in the second field. This a somewhat awkward generalization of the four-variable option. Example:Algiers (Algeria) [DZA] - The entire menu item has the form
xxxxx (lat, lon) [yyy]Thexxxxx—which can contain anything except( )—is inserted in the first field;latis inserted in the third field,lonin the fourth field, andyyyis in the second field. This is typically used for names with geocoordinates and codes, e.g.Algiers (36.757, 3.063) [DZA], butlatandlondo not need to be numbers
At present, there is only minimal error checking to insure that the fields are delimited correctly: These are taken
from a set menu, not user input, so it is the responsibility of the form developer to make sure these aren’t ambiguous
(e.g. the menu option Florence (Firenze) (43.821641, 11.286954) [ITA] will generate the string Firenze) (43.821641
as the lon field). Alternatively, you can add code in civet_coder.html to accommodate the more complex formats.
link: countryname countrycode [countrymenu]

link: cname ccode clat clong [geolocmenu]
textsource: Extract sources from annotated text
A textsource: field can be automatically linked to a textclass:
field so that the information in the textid: and/or textbiblio: field
for the workspace text block where an annotated word or phrase has been
extracted will be automatically added. This linkage is done by using
the variable name from a textclass field with _src added to the
end.
Except for the linkage, a textsource variable acts like a regular text
variable: information can be typed or pasted into the text box—typically this
will be done from the Source information that is visible when the
Show Comments option is active—and the variable can be saved.
If the variable name does not correspond to a textclass variable with
an added _src, textsource behaves the same as textline. [9]
The textid:/textbiblio: content is controlled by the preferences
“Use textid in source citation:” and “Use textbiblio in source citation:”;
the default uses only textbiblio:.
The width = number is optional and specifies the size of the text
entry box in characters: the default is width = 32
textsource: entry-title [var-name] width = numberinitial-text
Example:
textsource: Source for city [cityname_src] width=40
<enter source>
Additional web page formatting
title: Set page title
Sets the title of the web page: that is, the HTML``<title>...</title>`` section of the header.
title: page-title
Example:
title: CIVET-based coding form
Insert text
Adds text to the form: the various options follow the usual HTML
formats. In interests of simplicity, text is “escaped” so that special
characters are not interpreted as HTML: note that this means that
in-line mark-up such as <i>, <b> and <tt> will not work,
so if you need this activate and use the html: command. Also keep in
mind that these commands need to be separated by a blank line.
A “/” in the page-text will add a line-break <br>. To include a
“/” in the text, use “//”.
h1: page-texth2: page-texth3: page-texth4: page-textp: page-text
Example:
h1: Primary data set coding form

p:Please enter data in the fields below,/ and be really, really careful!
The simple command
p:
is useful for putting some space between form elements; this is equivalent to the “//” prefix in the data entry commands.
newline: Insert a line break
Adds a new line in the form; this is equivalent to the “/” prefix in the data entry commands.
newline:
Advanced formating options
A CIVET form is simply a web page, and consequently can be controlled by the standard commands for displaying web pages, notably cascading style sheets (CSS).
Set css
Adds the text which follows the command to the <style>...</style> section
in the page head. The text block is terminated by a blank line.
css:one or more lines of css definitions
Set form division sizes
This is a short-cut that for most options just changes the size of various components in either of these forms:
size: [division-name] width = <length> height = <length>size: [division-name] width : <length>; height : <length>
<size> can be any of the CSS “length” formats: http://www.w3schools.com/cssref/css_units.asp.
division-name is one of the following:
- body
- over-all size of the page
- civ-editor
- size of CKEditor text box on the annotation page
- civ-text-display
- size of the scrolling text display on the coding page
- civ-form
- size of the coding form created by the template in both the basic form and the coding page
Notes:
The system does not check for the validity of either the division names or the CSS <length> specification; if they can’t be interpreted they are ignored.
sizecommands can occur anywhere and can be combined with acsscommand: if they occur before thecsscommand the contents ofcsswill overridesize, and vice-versa if they occur afterwards: the CSS string for the<style>...</style>section is assembled in the order the commands occur.Because CSS doesn’t use object-like inheritance, the
size: [body]command resets all of the properties ofbody, leaving onlywidthandheightset in the style, e.g.body { width:900px; height:700px; }If you want to change the size but also retain other characteristics, use
cssto define the completebodystyle.The
civ-editorcommand changes the size in the configuration of CKEditor rather than any CSS, so this name cannot be used incss:(well, it can be used but it won’t do anything...). CKEditor does not allow the “%” option to be used as a “height”: see http://docs.ckeditor.com/#!/guide/dev_size. The CKEditor defaults to the width of the page (more or less) and a height of 200px.The
civ-formandciv-text-displaynames correspond correspond to<div class='name'>in the content of the form; you can modify these directly by using acss:``command. The ``sizecommand resets the <name>-size class, which only controls the size.
Insert HTML
[This command may or may not be included in the operational version of
the system, as it provides some opportunities for mischief. Stay tuned.
It is in the code but currently deactivated; if you are installing your
own version of the system, it can be activated by setting
civet_settings.HTML_OK = True.]
Adds arbitrary HTML code without escaping.
html:one or more lines of HTML
Footnotes
| [1] | Writing in HTML5 and CSS, one can actually exercise a very fine degree of control over the placement, but if you are comfortable with that sort of code, you presumably aren’t using CIVET in the first place. That said, you can see the HTML generated by CIVET by using the View source option in your browser, then save it as a file using Save Page As... and that could provide a starting point for creating prettier code. |
| [2] | This feature is actually a bit more subtle: cancellation is invoked when the first character in a line is “-” and there is a “:” in the line, which will always occur with a command. This allows default texts such as “- - -” to be used, though a default text such as “- - -: we really want to confuse CIVET” will cause an error. |
| [3] | In the current implementation, named HTML entities such as ©
and € can be included and should produce the correct
character. At present numbered entities such as [—the HTML
equivalent of ’]’—do not work since the # is interpreted as a comment
delimiter: depending on whether there is demand for this feature, the
system could provide a way around this. |
| [4] | This format can be changed in the function get_special_var(avar) in
civet_form.py: It is specified using the extensive Python/C date format
operators shown here. |
| [5] | In fact, the comments: command is just a shorthand for
textarea: entry-text [_comments_], and this will have the same
effect, with the contents added to the metadata. |
| [6] | Neither a bug nor a feature: just is what it is. |
| [7] | At present, only these two fields are available, but it is relatively straightforward to add the others by just following the existing code that you locate in a search for “textpublisher” |
| [8] | This is only done in the automatic annotation if
civet_settings.USE_GEOG_MARKUP = True: see the discussion in the
Preferences chapter. |
| [9] | In a future version of CIVET we hope to have a facility where citation
information can be transferred into a textsource field by clicking on
a lede but this has been implemented yet.
Preferences chapter. |